Running VCF 9 in a Nested Lab using vSAN ESA on a single host is that not great?

For the deployment I used a server that has 16 cores en 32 cores total and a lot of ram!

Installation on Nested ESX VM’s

For the nested ESX VMs I am using the generic ESX image. In my lab I’m using 4 nested ESX nodes for vSAN ESA (Minimum is needed is 3).

  • Ideally add 24 vCPUs to the nested ESX, but VCF Automation is capable of being deployed with 16 vCPUs
  • Check Expose hardware assisted virtualization to the guest OS under CPU
  • Add a NVME controller and connect disks to this controller if planning to use vSAN ESA (Don’t forget to remove the old Controller)
  • Add at least two VMXNET3 nics connected to the same network
  • Choose VMware ESXi 8.0 or later as the Guest OS version.
  • Change the IDE CD-ROM to SATA ROM (Failed to locate kickstart on Nested ESXi VM CD-ROM in VCF 9.0)

Afbeelding met tekst, schermopname, nummer, Lettertype

Door AI gegenereerde inhoud is mogelijk onjuist.

Config the 4 Host for vSAN ESA

To config the 4 Hosts for vSAN ESA I used my own powercli script where I blogged about here: Config vSAN ESA host or VCF ESA vSAN Host the easy way with Config-VSAN-ESA-VCF-Lab-Host Script

You can download the script HERE!

Installing the Vib works still great. No problem with ESA  Pre-check: ✅

If you have problems check this great blog from William Lam: vSAN ESA Disk & HCL Workaround for VCF 9.0

VCF installer.

At first you have to deploy the VMware Cloud Foundation

The name of the installer is a little off: VCF-SDDC-Manager-Appliance-9.0.0.0.24703748.ova

Download token

If you don’t have a download token from the Broadcom support then it’s a little complicated. I won’t go into this in depth now but here is a nice article if you have a Synology Nas: VCF 9.0 Offline Depot using Synology

(Note: For any vExpert reading this… You need to claim your own domain name because build your profile is not working with a @hotmail.com or @gmail accounts, Noted by Broadcom)

Afbeelding met tekst, schermopname, Parallel, ontwerp

Door AI gegenereerde inhoud is mogelijk onjuist.

I looks something like this!
Afbeelding met tekst, schermopname, Lettertype

Door AI gegenereerde inhoud is mogelijk onjuist.

10GBE Nic Pre-Check Issue

Next thing to do was: Disable 10GbE NIC Pre-Check in the VCF 9.0 Installer or this should also work: How to change the vmxnet3 link speed of a VM (Not tested)

Afbeelding met tekst, elektronica, schermopname, software

Door AI gegenereerde inhoud is mogelijk onjuist.

Deployment

I have deployed the beta in a earlier state. For deployment I used the same json file to start with.

VCF Automation will deployed automatically that was only the change that I changed it

Afbeelding met tekst, schermopname, nummer, software

Door AI gegenereerde inhoud is mogelijk onjuist.

Afbeelding met tekst, schermopname, Website, ontwerp

Door AI gegenereerde inhoud is mogelijk onjuist.

It’s running!
Afbeelding met tekst, schermopname, scherm, nummer

Door AI gegenereerde inhoud is mogelijk onjuist.

Afbeelding met tekst, lijn, nummer, Lettertype

Door AI gegenereerde inhoud is mogelijk onjuist.

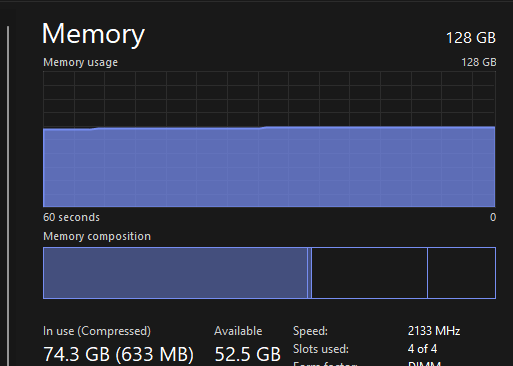
Performance running Nested!!

Afbeelding met tekst, lijn, Perceel, Lettertype

Door AI gegenereerde inhoud is mogelijk onjuist.

Above the screenshot from the host with de Nested VCF lab deployment it’s quite cpu intensive (2 x CPU 8cores / 16 Threads)

Optimalization

After the deployment I did three things
– On the vSAN ESA Cluster (Disable Auto Disk Claim) (Keep the warning away)
– On the NSX VM reduce the cpu reservation from 6000 🡪 2000 (It helps but not enough)
– VCF automation VM 24 cores to 16 cores.

NSX en VCF automation are really CPU intensive.

I had deployed also two Edge servers but the server did not like that. Edges are also CPU intensive.

I am thinking about adding MS-01 or MS-A2 for splitting some load.

Config vSAN ESA host or VCF ESA vSAN Host the easy way with Config-VSAN-ESA-VCF-Lab-Host Script.

William Lam created the vSAN ESA HCL hardware mock VIB for Nested ESXi.
It works great for vSAN ESA or for VCF vSAN ESA Nested nodes.

You can download the needed vib here

A whale ago I found a easy way to the deployment of a VMware SDDC based on vSAN ESA: VCF automated lab deployment with vSAN ESA

It works great. I a few hours you have a working VCF management domain on vSAN ESA.

Sow what about the script

For the Workload domain domain I created de nested ESXi vm’s manually .
And I did some testing for VCF 9 which I created the nested ESXi host also manually.

Configure by hand takes a lot of time. So I did some scripting and I used some code
from: VCF automated lab deployment with vSAN ESA

So I created a script that does the following:

  • Login on DHCP address en configure a Fixt IP address based on DNS name
  • Disable IPv6
  • Rename the local datastore to a uniek name with the name of the host
  • Configure NTP
  • Install the vSAN ESA VIB mock en restart vSAN mgmt.
  • Generate new certificate for the host with the correct domain name in it.
  • Enable KB372309 (10GB ethernet for vSAN ESA)

It works great for ESXi Nested nodes (ESXi 8.0u3b and ESXi9.X beta)

You can find the script HERE!!

Afbeelding met tekst, schermopname, nummer, Lettertype

Door AI gegenereerde inhoud is mogelijk onjuist.

Afbeelding met tekst, schermopname, nummer, Lettertype

Door AI gegenereerde inhoud is mogelijk onjuist.

Deploying VCF Workload Domain with One NSX Manager

For your VCF homelab you wan to keep the resources small with a little bit overhead.
In this post I will talk about how i managed to deploy a VCF Workload Domain with a single NSX Manager, instead of the standard three nsx nodes.

Warning: Use this only in a Homelab!

The trick is to SSH into your SDDC Manager using the vcf user, and the password used during bring-up of the management domain.

When logged in, run su and log in as root using the password used during bring-up.

run: vi /etc/vmware/vcf/domainmanager/application-prod.properties

Hit i in your keyboard to go into insert mode. Go to the end of the file, and append the following:

nsxt.manager.formfactor=medium
nsxt.manager.resources.validation.skip=true
nsxt.manager.cluster.size=1
nsxt.manager.wait.minutes=120

This will make it so that any workload domain you deploy has one NSX Manager, and that it uses a smaller size. Once done, hit ESC in your keyboard, then type :wq and hit enter to save the file. (w = write, q = quit).

Then run systemctl restart domainmanager and you are good to go!

This worked in my nested Cloud Foundation deployment in my lab running 5.2.1.0.

You will still have to fill in the information for the extra nodes in the UI.

Easy Script to Create DNS Records in VCF Lab

When you build your VCF Lab environment you want to create your DNS records automatically. I use for DNS a Windows Server.

The Script:

function ConvertTo-DecimalIP {
param ([string]$ip)
$parts = $ip.Split(‘.’) | ForEach-Object { [int]$_ }
return ($parts[0] -shl 24) + ($parts[1] -shl 16) + ($parts[2] -shl 8) + $parts[3]
}

function ConvertTo-DottedIP {
param ([int]$intIP)
$part1 = ($intIP -shr 24) -band 0xFF
$part2 = ($intIP -shr 16) -band 0xFF
$part3 = ($intIP -shr 8) -band 0xFF
$part4 = $intIP -band 0xFF
return “$part1.$part2.$part3.$part4”
}

$zone = “testlab.nl”
$startip = “192.168.200.10”

$dnsrecords = “vcf-m01-cb01″,”vcf-m01-sddcm01″,”vcf-m01-esx01″,”vcf-m01-esx02″,”vcf-m01-esx03″,”vcf-m01-esx04″,”vcf-w01-esx02″,”vcf-w01-esx03″,”vcf-w01-esx04″,”vcf-w01-esx04″,”vcf-m01-nsx01a”,”vcf-m01-nsx01b”,”vcf-m01-nsx01c”,”vcf-m01-nsx01″,”vcf-w01-nsx01a”,”vcf-w01-nsx01b”,”vcf-w01-nsx01c”,”vcf-w01-nsx01″,”vcf-m01-vc01″,”vcf-w01-vc01″
$count = $dnsrecords.count

# Convert start IP to decimal

$decimalIP = ConvertTo-DecimalIP $startIP
$i = 0

# Loop and print incremented IPs

foreach ($dnsrecord in $dnsrecords) {
$i -lt
$count;
$i++
$currentDecimalIP = $decimalIP + $i
$currentIP = ConvertTo-DottedIP $currentDecimalIP
Add-DnsServerResourceRecordA -Name $dnsrecord -ZoneName $zone -AllowUpdateAny -IPv4Address $currentIP -CreatePtr
Write-Output “DNS record $dnsrecord in $zone with $currentIP is created” -ForegroundColor Green

How to Obtain 3 Years of VMware Licenses with Certification

By passing either of the new VCP-VCF level certification exam(s), anyone maintaining an active VMUG Advantage membership can receive 3 years worth of extensive VMware Cloud Foundation licensing for home lab use!

Afbeelding met tekst, computer, schermopname, Website

Door AI gegenereerde inhoud is mogelijk onjuist.

The VMUG Advantage program has offered affordable home lab VMware licensing packages for years, but did cover most over the entire product portfolio.

Last year Broadcom made a change into this.

Option 1: Get vSphere Standard Edition 32 cores for 1 year: Pass one of the following VCP certification exams

  • VCP-VVF (admin/architect)
  • VCP-VCF (admin/architect)

Option 2:  Get VMware Cloud Foundation (VCF) 128 cores for 3 years: Purchase & Maintain VMUG Advantage, pass the following VCP certification exam.

  • VCP-VCF (admin/architect)

A VMUG Advantage membership was complimentary for vExperts in 2025

The membership is $210 otherwise, and does include a voucher for a 50% discounted VCP-VCF exam

With the requirements in place, head to the Broadcom “VCP Certification Non-Production Licenses” portal and request licenses.

Afbeelding met tekst, software, Computerpictogram, Webpagina

Door AI gegenereerde inhoud is mogelijk onjuist.

How to get Aria Operations (Skyline) Diagnostics working

On the 4th Oktober VMware Skyline was end of life.

Afbeelding met tekst, schermopname, elektronica, stroomkring

Automatisch gegenereerde beschrijving

VMware Skyline was great:
• Proactive Issue Identification
• Automated Insights
• Health Scans and Remediation
• Integration with support

VMware by Broadcom are building critical Findings and Self-Help recommendations directly in product starting with VCF (from 5.2) and Aria Operations (from v8.18 July 2024)

Many of the other Skyline features are being planned for inclusion in future  releases in Cloud Foundation and Aria Operations. We will see what the future will bring.
But for now how do you get this working.

First Step:

Update Aria Operations to 8.18.2 (Lastest)

Second Steps:

1. vCenter (Don’t for get enable vSAN), NSX, VCF, Aria vRA

2. Configure log collection in Aria Logs for the following components:

• Configure vCenter server integration in Aria for Logs

• Configure log forwarding on vCenter server, ESXi hosts(automatically in Aria FOR logs), and SDDC manager

3. Integrating VMware Aria Operations for Logs and VMware Aria Operations

4. Connect Skyline Health Diagnostics (SHD)

5. In Aria LoginSight check the vRops integration checkboxes

Bij default Enable launch in context can be disabled when configured at first.

After upgrading and checking the settings its finally working 😊 (It can take some time).
Afbeelding met schermopname, Multimediasoftware, Grafische software, software

Automatisch gegenereerde beschrijving

Essential Insights on Windows Server 2025

Essential Insights on Windows Server 2025

  1. Free Windows Server 2025 Security Advice Book read here and download here
  2. Windows Server 2025 is Certified on VMware vSphere
  3. Windows Server 2025 known issues and notifications
  4. New & Updated Security Tools
  5. Windows Server 2022 to 2025: Active Directory Upgrade Guide

How to Remove Inaccessible vSAN Objects in vSphere: Step-by-Step Guide

This post is about how to remove such an inaccessible object within vSAN.

Afbeelding met tekst, schermopname, nummer, Lettertype

Automatisch gegenereerde beschrijving

Open an SSH session to the vCenter and enter the command rvc localhost in the command line.

Navigate to the destinated vSAN cluster where you want to remove the inaccessible objects using cd and utilize ls to list in each step like this one:

Verify the state of vSAN objects using the command vsan.check_state -r . This check involves three steps:

  • Checking for inaccessible vSAN objects
  • Verifying invalid or inaccessible VMs, and
  • Checking for VMs for which VC/hostd/vmx are out of sync

During this check, as you can see in the next screenshot, there are four inaccessible objects with the same UUID as those listed in Virtual Objects within the vSphere Client.

Afbeelding met tekst, schermopname, Lettertype

Automatisch gegenereerde beschrijving

To remove them, open an SSH session to any ESXi in the cluster and use the following command /usr/lib/vmware/osfs/bin/objtool delete -u <UUID> -f replacing UUID with the one you want to remove. Afbeelding met tekst, schermopname, Lettertype

Automatisch gegenereerde beschrijving

After you remove all inaccessible objects and run the (vsan.checkstate -r .) once again, you should no longer see any inaccessible objects. Afbeelding met tekst, schermopname, software, Lettertype

Automatisch gegenereerde beschrijving

ESXi Unattend Install on Dell BOSS controller

I had the opportunity to test a Dell vSAN node. I had a older unattend install esxi iso.
This installed the ESXi OS on the wrong disk.

I hate to type a very complex password twice.
So automation is the key.
I love de ks.cfg install option

Sow following the following guide did not the trik:
https://www.dell.com/support/kbdoc/en-us/000177584/automating-operating-system-deployment-to-dell-boss-techniques-for-different-operating-systems

VMware ESXi Automated Install

This did not work:
install –overwritevmfs –firstdisk=”DELLBOSS VD”

After doing a manual install:
Afbeelding met tekst, schermopname

Automatisch gegenereerde beschrijving

What works:

# For Dell Boss Controller “Dell BOSS-N1″

install –overwritevmfs –firstdisk=”Dell BOSS-N1”

My HomeLab anno 2024

My home lab is manly used for testing new stuff released by VMware (70%) en Microsoft (20%) other stuff (10%)

For the Base I use my Home PC

Intel i5 12600k
128 GB Memory
2 x 2TB Samsung 980 and 990 Pro SSD.
Windows 11 Pro
VMware Workstation Pro

On my Home PC running
Server 2022 (Eval for DC)
ESXi801 (16 GB) (NSX Demo Cluster)
ESXi802 (16 GB) (NSX Demo Cluster)
ESXi803 (64 GB) (General Cluster) )
ESXi804 (64 GB) (General Cluster)
ESXi805 (24 GB) (Single Node vSAN Cluster)
ESXi806 (16 GB) (4 Node vSAN Cluster)
ESXi807 (16 GB) (4 Node vSAN Cluster)
ESXi808 (16 GB) (4 Node vSAN Cluster)
ESXi809 (16 GB) (4 Node vSAN Cluster)

ESXi701 (24GB) (General Cluster)
ESXi702 (24GB) (General Cluster)

In general cluster there a running the most VM’s. Also here I am testing Packer and Terraform.

Afbeelding met tekst, schermopname, software, Lettertype

Automatisch gegenereerde beschrijving

For a while I used a 2TB Samsung SSD a Storage for ESXi Server through Truenas
But I wanted a larger storage for all my VM’s.

After reading on William Liam blog Synology DS723+ in Homelab and Synology NFS VAAI Plug-in support for vSphere 8.0

So I did a nice upgrade. Afbeelding met tekst, schermopname, software, nummer

Automatisch gegenereerde beschrijving

I used not the original Synology Parts. Following parts works fine.
Kingston 16 GB DDR4-3200 notebook memory
WD Red SN700, 500 GB SSD
WD Red Pro, 8 TB

* For Read-Write caching you need 2 SSD devices.

For mouting the NFS shared I created a little powercli script.

https://github.com/WardVissers/VMware-Powercli-Public/blob/main/Add%20NFS%20DataStore%20Github.ps1
Translate »