VMware Cloud Foundation (VCF) 9.1 is here — and it’s one of the most feature‑packed releases in years. This update isn’t just incremental; it’s a strategic modernization of compute, storage, networking, security, and operations across the entire private cloud stack.
.
Let’s break down the biggest enhancements and why they I think they matter.
Modernizing Infrastructure Economics with vSphere Foundation 9.1
VCF 9.1 brings several powerful updates to the vSphere layer, aimed at improving performance efficiency and reducing operational overhead.
Enhanced NVMe Memory Tiering
Workloads that demand high throughput and low latency benefit from smarter memory tiering. NVMe-based memory tiers now deliver improved performance and flexibility. (And yes — many are hoping Secure Boot support lands here as well.)
Parallel Processing of DRS vMotion
DRS can now process multiple vMotions in parallel, dramatically reducing cluster balancing times. This is especially impactful in large-scale environments with frequent workload mobility.
Live Patching for TPM-Enabled Hosts
Live patching now works even on hosts with TPM enabled — a huge win for security-conscious organizations that previously had to choose between uptime and compliance.
Networking Updates: Scale, Simplicity, and Smarter Automation
VCF 9.1 introduces major networking enhancements that streamline operations and expand connectivity options.
Enhanced Day-2 VM Lifecycle Management
Networking changes for VMs — including NIC updates, IP changes, and security policies — are now easier and more automated.
Existing VLAN Connectivity via Distributed Transit Gateways
You can now bridge existing VLAN-based networks into VCF environments more seamlessly, reducing migration friction and simplifying hybrid designs.
VCF 9.1 now supports EVPN-VXLAN interoperability with the physicalnetwork fabric. This is a major step toward fully integrated, fabric-aware cloud networking.
Network Assessment & VPC Planning
New tools and workflows help architects plan VPC layouts, assess network readiness, and avoid misconfigurations before deployment.
Optimize, Modernize & Protect Storage with vSAN in VCF 9.1
Storage gets a significant upgrade in this release, especially for environments focused on efficiency and resilience.
Encryption for vSAN Global Deduplication
Global dedupe is now compatible with data-at-rest encryption — a long-awaited capability for secure, space-efficient storage.
Enhanced Stretched Cluster Capabilities
Improved resilience and smarter failure handling strengthen business continuity for mission-critical workloads.
Automated Storage Policy Management
Policies now adjust automatically based on cluster configuration changes, reducing manual tuning and risk of misalignment.
Strengthening Zero Trust Security & Platform Resilience
Security is a major theme in VCF 9.1, with improvements across the stack.
Data-at-Rest Encryption for Global Dedupe
This ensures encrypted storage without sacrificing dedupe efficiency — a rare combination in enterprise storage.
Quick Patching for vCenter
Faster patch cycles reduce exposure windows and simplify maintenance.
Live Patching for TPM-Enabled Hosts
As mentioned earlier, this is a major operational win for secure environments.
Continuous Compliance & Integrated Cyber Recovery
VCF 9.1 pushes deeper into automated compliance and recovery workflows.
Compliance Monitoring & Desired State Remediation
The platform now continuously checks VCF components against desired state and can automatically remediate drift.
VPC Policy-Based Connectivity
Security and connectivity policies can now be applied consistently across VPCs, improving governance and reducing misconfigurations.
VMware Data Services Manager 9.1: Modern Databases for AI & Cloud
Microsoft SQL Server 2022 Now GA
SQL Server 2022 is now fully supported and generally available through DSM 9.1, enabling automated lifecycle management for modern database workloads — including those powering AI and analytics.
Want to See It in Action?
VMware has published a full VCF 9.1 video podcast series that dives deeper into the new capabilities:
Enough to do in my Homelab Starting with Upgrade and testing the new features!!
At first you have to deploy the VMware Cloud Foundation
The name of the installer is a little off: VCF-SDDC-Manager-Appliance-9.0.0.0.24703748.ova
Download token
If you don’t have a download token from the Broadcom support then it’s a little complicated. I won’t go into this in depth now but here is a nice article if you have a Synology Nas: VCF 9.0 Offline Depot using Synology
(Note: For any vExpert reading this… You need to claim your own domain name because build your profile is not working with a @hotmail.com or @gmail accounts, Noted by Broadcom)
I have deployed the beta in a earlier state. For deployment I used the same json file to start with.
VCF Automation will deployed automatically that was only the change that I changed it
It’s running!
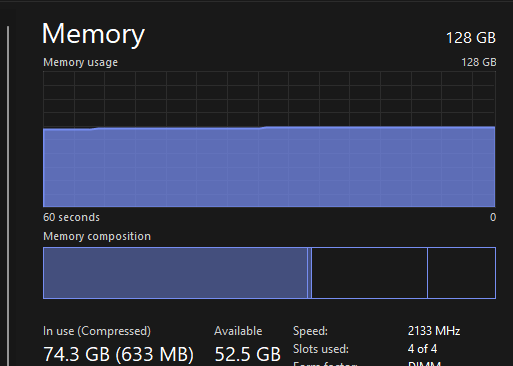
Performance running Nested!!
Above the screenshot from the host with de Nested VCF lab deployment it’s quite cpu intensive (2 x CPU 8cores / 16 Threads)
Optimalization
After the deployment I did three things
– On the vSAN ESA Cluster (Disable Auto Disk Claim) (Keep the warning away)
– On the NSX VM reduce the cpu reservation from 6000 🡪 2000 (It helps but not enough)
– VCF automation VM 24 cores to 16 cores.
NSX en VCF automation are really CPU intensive.
I had deployed also two Edge servers but the server did not like that. Edges are also CPU intensive.
I am thinking about adding MS-01 or MS-A2 for splitting some load.
This post is about how to remove such an inaccessible object within vSAN.
Open an SSH session to the vCenter and enter the command rvc localhost in the command line.
Navigate to the destinated vSAN cluster where you want to remove the inaccessible objects using cd and utilize ls to list in each step like this one:
Verify the state of vSAN objects using the command vsan.check_state -r . This check involves three steps:
Checking for inaccessible vSAN objects
Verifying invalid or inaccessible VMs, and
Checking for VMs for which VC/hostd/vmx are out of sync
During this check, as you can see in the next screenshot, there are four inaccessible objects with the same UUID as those listed in Virtual Objects within the vSphere Client.
To remove them, open an SSH session to any ESXi in the cluster and use the following command /usr/lib/vmware/osfs/bin/objtool delete -u <UUID> -f replacing UUID with the one you want to remove.
After you remove all inaccessible objects and run the (vsan.checkstate -r .) once again, you should no longer see any inaccessible objects.
I had the opportunity to test a Dell vSAN node. I had a older unattend install esxi iso.
This installed the ESXi OS on the wrong disk. After a correct install vSAN did not see this this disk ready for use for vSAN. Combining the following articles Dell VXRai vSAN Drives ineligible and identify-and-solve-ineligible-disk-problems-in-virtual-san/
I solved this problem with the following steps:
Step 1: Identify the Disk with vdq -qH
Step 2: Use partedUtil get “/dev/disks/<DISK>” to list all partitions:
partedUtil get “/dev/disks/t10.NVMe____Dell_Ent_NVMe_CM6_MU_3.2TB______________017D7D23E28EE38C”
Step 3: Use This disk has 2 partitions. Use the partedUtil delete “/dev/disks/<DISK>” <PARTITION> command to delete all partitions:
So I interested to trying to deploy latest release of VMware Cloud Foundation (VCF) 5.0 on my Windows 11 Home PC witch have 128GB and 16 core intel cpu.
VCF-M01-CB01 (4GB and 4CPU) Only needed through First Deploment
Network settings on my PC
1 IP In my home network
172.16.12.1 (To Fool Cloudbuilder)
172.16.13.1 (To Fool Cloudbuilder)
Procedure:
Install en Configure ESXi
Step 1 – Boot up the ESXi installer from de iso mount and then perform a standard ESXi installation.
Step 2 – Once ESXi is up and running, you will need to minimally configure networking along with an FQDN (ensure proper DNS resolution), NTP and specify which SSD should be used for the vSAN capacity drive. You can use the DCUI to setup the initial networking but recommend switching to ESXi Shell afterwards and finish the require preparations steps as demonstrated in the following ESXCLI commands:
esxcli system ntp set -e true -s pool.ntp.org
esxcli system hostname set –fqdn vcf-m01-esx01.wardvissers.nl
Note: Use vdq -q command to query for the available disks for use with vSAN and ensure there are no partitions residing on the 600GB disks.
Don’t change time server pool.ntp.org.
To ensure that the self-signed TLS certificate that ESXi generates matches that of the FQDN that you had configured, we will need to regenerate the certificate and restart hostd for the changes to go into effect by running the following commands within ESXi Shell:
Step 3 – Deploy the VMware Cloud builder in a separate environment and wait for it to be accessible over the browser. Once CB is online, download the setup_vmware_cloud_builder_for_one_node_management_domain.sh setup script and transfer that to the CB system using the admin user account (root is disabled by default).
Step 4 – Switch to the root user and set the script to have the executable permission and run the script as shown below
su –
chmod +x setup_vmware_cloud_builder_for_one_node_management_domain.sh
./setup_vmware_cloud_builder_for_one_node_management_domain.sh
The script will take some time, especially as it converts the NSX OVA->OVF->OVA and if everything was configured successfully, you should see the same output as the screenshot above.
Step 4 – Download the example JSON deployment file vcf50-management-domain-example.json and and adjust the values based on your environment. In addition to changing the hostname/IP Addresses you will also need to replace all the FILL_ME_IN_VCF_*_LICENSE_KEY with valid VCF 5.0 license keys.
Step 5 – The VMnic in the Cloud Builder VM will acked als a 10GB NIC so I started the deployment not through powershell but normal way in Cloud Builder GUI.
Your deployment time will vary based on your physical resources but it should eventually complete with everything show success as shown in the screenshot below. (I have one retry for finish)
Here are some screenshots VCF 5.0 deployment running on my home PC.
Virtual Machine with Windows Server 2022 with KB5022842 (Feb 2023) installed en configured with secure boot enabled will not boot up on vSphere 7 unless updated to 7.0u3k (vSphere 8 not affected)
In VM vmware.log, there is ‘Image DENIED’ info like the below:
2023-02-15T05:34:31.379Z In(05) vcpu-0 – SECUREBOOT: Signature: 0 in db, 0 in dbx, 1 unrecognized, 0 unsupported alg.
2023-02-15T05:34:31.379Z In(05) vcpu-0 – Hash: 0 in db, 0 in dbx.
2023-02-15T05:34:31.379Z In(05) vcpu-0 – SECUREBOOT: Image DENIED.
To identify the location of vmware.log files:
Establish an SSH session to your host. For ESXi hosts
Log in to the ESXi Host CLI using root account.
To list the locations of the configuration files for the virtual machines registered on the host, run the below command:
#vim-cmd vmsvc/getallvms | grep -i “VM_Name”
The vmware.log file is located in virtual machine folder along with the vmx file.
Record the location of the .vmx configuration file for the virtual machine you are troubleshooting. For example:
If you already face the issue, after patching the host to ESXi 7.0 Update 3k, just power on the affected Windows Server 2022 VMs. After you patch a host to ESXi 7.0 Update 3k, you can migrate a running Windows Server 2022 VM from a host of version earlier than ESXi 7.0 Update 3k, install KB5022842, and the VM boots properly without any additional steps required.
On the 16th of September, a KB article was published by VMware, which contains statements of Removal of SD card/USB as a standalone boot device option.
USB/SD is not the right choice going forward! Why? The volume of reads/writes to and from the OS-DATA partition continues to increase with every release, which means that the lower grade devices will simply wear out faster.
Websites store cookies to enhance functionality and personalise your experience. You can manage your preferences, but blocking some cookies may impact site performance and services.
Essential cookies enable basic functions and are necessary for the proper function of the website.
Name
Description
Duration
Cookie Preferences
This cookie is used to store the user's cookie consent preferences.
30 days
Statistics cookies collect information anonymously. This information helps us understand how visitors use our website.
Google Analytics is a powerful tool that tracks and analyzes website traffic for informed marketing decisions.
Contains information related to marketing campaigns of the user. These are shared with Google AdWords / Google Ads when the Google Ads and Google Analytics accounts are linked together.
90 days
__utma
ID used to identify users and sessions
2 years after last activity
__utmt
Used to monitor number of Google Analytics server requests
10 minutes
__utmb
Used to distinguish new sessions and visits. This cookie is set when the GA.js javascript library is loaded and there is no existing __utmb cookie. The cookie is updated every time data is sent to the Google Analytics server.
30 minutes after last activity
__utmc
Used only with old Urchin versions of Google Analytics and not with GA.js. Was used to distinguish between new sessions and visits at the end of a session.
End of session (browser)
__utmz
Contains information about the traffic source or campaign that directed user to the website. The cookie is set when the GA.js javascript is loaded and updated when data is sent to the Google Anaytics server
6 months after last activity
__utmv
Contains custom information set by the web developer via the _setCustomVar method in Google Analytics. This cookie is updated every time new data is sent to the Google Analytics server.
2 years after last activity
__utmx
Used to determine whether a user is included in an A / B or Multivariate test.
18 months
_ga
ID used to identify users
2 years
_gali
Used by Google Analytics to determine which links on a page are being clicked
30 seconds
_ga_
ID used to identify users
2 years
_gid
ID used to identify users for 24 hours after last activity
24 hours
_gat
Used to monitor number of Google Analytics server requests when using Google Tag Manager




You must be logged in to post a comment.