MDT v.Next Coming….

New core tools

Windows 10 ADK supports Windows 7, Windows 8.1 and Windows 10 deployments.

Windows Image Configuration Designer (WICD), pronounced Wicked ?   🙂  Is supposed to be able to build a customized mobile or desktop image, and also create provisioning packages that allow you to customize a Windows device, without re-imaging.

Microsoft Deployment Toolkit v.Next (MDT) (standalone)

New upcoming version of MDT is in development, not much info presented yet, but a few items were mentioned in the session:

Windows 10 Deployment and Upgrade Support, as well as updated Task Sequence binaries

Removed deprecated components from Deployment Workbench, and making OSD more accessibility compliant.

MDT documentation will be on TechNet (removed legacy help file and DOCX)

Clean Up your template before Sysprep and Capture a reference image in MDT

When you create a reference Image it will in most cases it will be updated with patches. That will make the image bigger and bigger and there fore the deployment of that image will take longer and consume more network resources & unneeded disk space. That can be corrected by getting rid of superseded patches, junk, temp files and much more.

The Solution

Since MDT is the preferred method to create reference images you can download the script, import it as an application and then run the application just before the Sysprep and Capture step. The Script works for the following versions of Windows:

  • Windows 7 SP1
  • Windows 8
  • Windows 8.1 Update
  • Windows Server 2008 2 SP1
  • Windows Server 2012
  • Windows Server 2012 R2

To make this work in Windows 7 and Windows Server 2008 R2 you need to add a hotfix to Packages in MDT. http://support.microsoft.com/kb/2852386

Download the script

Download the script from here: Mirror Mirror 2

Action-CleanupBeforeSysprep Applicationimage

Task Sequenceimage

Created a Group Clean.
Add install a application –> Action-CleanUpBeforeSysprep
Restart Computer (Very Important) without it will not work

image

Source

Windows 8.1 Update (KB 2919355) prevents interaction with WSUS 3.2 over SSL

There is a known issue which causes some PCs updated with the Windows 8.1 Update (KB 2919355) to stop scanning against Windows Server Update Services 3.0 Service Pack 2 (WSUS 3.0 SP2 or WSUS 3.2) servers which are configured to use SSL and have not enabled TLS 1.2.

Issue Description

The problem is specific to the following scenario when all of the following are true

  1. Client PC has installed Windows 8.1 Update KB 2919355
  2. Windows 8.1 with Windows 8.1 Update KB 2919355 attempts to scan against WSUS 3.2 running on any affected platform:
    • Windows Server 2003 SP2, or
    • Windows Server 2003 R2 SP2, or
    • Windows Server 2008 SP2, or
    • Windows Server 2008 R2 SP1
  3. HTTPS and Secure Sockets Layer (SSL) are enabled on the WSUS server
  4. TLS 1.2 is not enabled on the server

Only users who have enabled HTTPS and have not enabled TLS 1.2 on their WSUS 3.2 servers and who are also using these WSUS 3.2 servers to manage PCs running the Windows 8.1 Update KB 2919355 are affected by this issue. Please note, while we do recommend the use of HTTPS on WSUS servers, HTTPS and TLS 1.2 are not enabled by default.

Workarounds

If you are using WSUS 3.2 on Windows Server 2008 R2, you may perform either of the following steps to restore the scan functionality if you have deployed the Windows 8.1 Update KB2919355.

  • Enable TLS 1.2 (follow the instructions under More Information > SCHANNEL\Protocols subkey), or
  • Disable HTTPS on WSUS

If you are using WSUS 3.2 on an operating system other than Windows Server 2008 R2, you may perform the following step to restore the scan functionality.

  • Disable HTTPS on WSUS

When Microsoft releases an update that resolves the issue, you may re-enable HTTPS on WSUS.

Microsoft plans to issue an update as soon as possible that will correct the issue and restore the proper behavior for Windows 8.1 Update KB 2919355 scanning against all supported WSUS configurations. Until that time, we are delaying the distribution of the Windows 8.1 Update KB 2919355 to WSUS servers.

You may still obtain the Windows 8.1 Update (KB 2919355) from the Windows Update Catalog or MSDN. However, we recommend that you suspend deployment of this update in your organization until we release the update that resolves this issue. You may also find the workarounds discussed in this article to be useful for testing this Windows 8.1 Update for your organization. Thank you for your patience during this time.

Server 2012 R2 Update & Windows 8.1 Update (KB2919355) direct download links

Server 2012 R2 Update & Windows 8.1 Update is a cumulative set of security updates, critical updates and updates.

Windows 8.1 Update for x86 (KB2919355)

Windows 8.1 Update for x64 (KB2919355)

Windows Server 2012 R2 Update (KB2919355)

Windows ADK 8.1 update (for Windows 8.1 Update) is available for download:

The Windows ADK 8.1 update (for Windows 8.1 Update) is available for download:

Windows ADK 8.1 update (direct download only: http://www.microsoft.com/en-us/download/details.aspx?id=39982

You still run adksetup.exe to install or download the updated ADK, but you do see that the new ADK is slightly bigger than the previous kit. The Patches folder content also have a higher version number. The October 18, 2013 release of Windows 8.1 ADK had a folder named 8.100.26020, but the April 2, 2014 release of Windows 8.1 ADK have 8.100.26629.

New features in ADK 8.1 are the WIMBoot option, updates to dism, updates to WinRE and a new WinPE version (5.1). There are also fixes for USMT.

Important Change:
DISM: Does not support Windows Vista or Windows Server 2008 images.

More info about the changes here: http://msdn.microsoft.com/en-us/library/windows/hardware/dn247001.aspx

Info on updating WinPE 5.0 to WinPE 5.1: http://technet.microsoft.com/en-us/library/dn613859.aspx

Sysprep Windows Server 2012 (R2) Faster with /mode:vm Switch

Windows Server 2012’s System Preparation Tool (sysprep.exe) contains a new switch that allows system administrators to generalize the OS (remove any installation specific configuration) faster than previous versions of the tool that were designed for use on physical hardware.

What’s New in Sysprep for Windows Server 2012?

The new VM-mode method for generalizing a Windows 8 or Server 2012 installation only works from inside a virtual machine. Once sysprep has completed the generalization and shutdown the VM, you can copy the VM’s .vhd file and attach it to a new VM in any system that uses the same hypervisor technology.

Use Sysprep to Generalize Windows Server 2012 Running in a VM

You will need to use sysprep from the command line, as there is no option to enable VM mode in the GUI.

  • Install Windows 8 or Windows Server 2012 (or later editions) in a virtual machine.
  • Customize the operating system as required.
  • Switch to the Start screen and type cmd. Make sure that Command Prompt is highlighted in the search results and press CTRL+SHIFT+ENTER to launch the process with administrative privileges. Give consent or enter credentials if prompted.
  • Change the working directory to System32 by typing cd c:\windows\system32\sysprep and pressing Enter.
  • To run sysprep with the standard GUI options, but also the /mode:vm switch, type sysprep.exe /oobe /generalize /shutdown /mode:vm and press Enter.

Incompatibility between Windows 8 roaming user profiles and roaming profiles in other versions of Windows

Roaming user profiles on Windows 8-based or Windows Server 2012-based computers are incompatible with roaming user profiles in other versions of Windows.
Profiles are compatible only between the following client and server operating system pairs: 

  • Windows 8.1 and Windows Server 2012 R2
  • Windows 8 and Windows Server 2012 
  • Windows 7 and Windows Server 2008 R2
  • Windows Vista and Windows Server 2008 

Note In this article, when the client operating system is referenced, the same issue applies to its corollary server operating system.
For example, if you try to deploy Windows 8 in an environment that uses roaming, mandatory, super-mandatory, or domain default profiles in Windows 7, you experience the following:

  • After you use a user account that has an existing Windows 7 profile to log on to a Windows 8-based computer for the first time, the components from Windows 8 read and modify the profile state.
  • Certain Windows 8.1 features may not work as expected because the expected profile state is not present.
  • When you try to use the same user account to log on to a Windows 7-based computer, the user profile modification that was performed in Windows 8 may not work as expected in Windows 7.

The issues occur because the profile will contain values that are used differently between the versions of Windows. The user profile will be missing default profile configuration information that is expected by the operating system, and could contain unexpected values that are set by a different operating system version. Therefore, the operating system will not behave as expected. Additionally, profile corruption may occur.


Hotfix: Download

Adding GPO Pack support in MDT 2013 for Windows 8.1 & 2012 R2

If you ever tried to use GPO Packs in MDT 2013 or ConfigMgr 012 R2, you quickly find out they will fail for Windows 8.1 or 2012 R2. The reason?  Microsoft forgot to add support for Windows 8.1 in the ZTIApplyGPOPack.wsf script.
Luckily it’s easy to fix, and while you’re at it, why not also add support for Windows Server 2012 R2.

Fix the bug

Find the following section in ZTIApplyGPOPack.wsf (line 86 – 92):

sOSVersion = oEnvironment.Item(“OSCurrentVersion”)
If (Left(sOSVersion,3) = “6.2”) and oEnvironment.Item(“IsServerOS”) then
    sOS = “WS2012RTM”
    oLogging.CreateEntry “Using Default Windows Server 2012 RTM GPO Pack”, LogTypeInfo
ElseIf (Left(sOSVersion,3) = “6.2”) and Not(oEnvironment.Item(“IsServerOS”)) then
    sOS = “Win8RTM”
    oLogging.CreateEntry “Using Default Windows 8 RTM GPO Pack”, LogTypeInfoAnd change to:

If (Left(sOSVersion,3) = “6.3”) and oEnvironment.Item(“IsServerOS”) then
    sOS = “WS2012R2”
    oLogging.CreateEntry “Using Windows Server 2012 SP1 PO Pack”, LogTypeInfo
ElseIf (Left(sOSVersion,3) = “6.3”) and Not(oEnvironment.Item(“IsServerOS”)) then
    sOS = “Win81”
    oLogging.CreateEntry “Using Windows 8.1 GPO Pack”, LogTypeInfo
ElseIf (Left(sOSVersion,3) = “6.2”) and oEnvironment.Item(“IsServerOS”) then
    sOS = “WS2012RTM”
    oLogging.CreateEntry “Using Default Windows Server 2012 RTM GPO Pack”, LogTypeInfo
ElseIf (Left(sOSVersion,3) = “6.2”) and Not(oEnvironment.Item(“IsServerOS”)) then
    sOS = “Win8RTM”
    oLogging.CreateEntry “Using Default Windows 8 RTM GPO Pack”, LogTypeInfo

Or download the file Winking smile

ZTIApplyGPOPack.7z

MDT Packages & WSUS a very nice feature.

I long time ago I wrote a acticle mdt-automatisch-updates-via-wsus-laten-installeren-tijdens-het-deployen-van-het-os (Dutch) about using wsus with MDT.

After you deploy a Windows 7 SP1 machine updating takes a lot of time.

You can slipstream windows security updates when you deploy a machine… Windows 7 / Windows 8 / Windows 2008 R2 / Windows 2012.

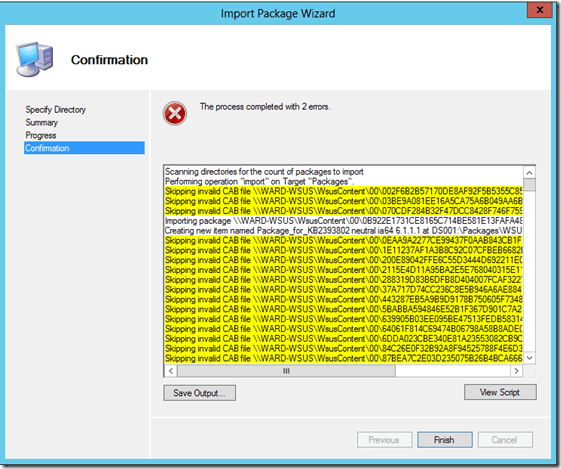
How you do this: It’s quit simpley. Import de WSUS Content in to Packages.

 1

2

3

4

5

The error is normal because not everything is imported.

Important:

Delete every time you do this. Update & Hotfix packages. If you don’t you will end in a error state when you deploy a machine.

Removing Windows 8.1 Built-in Applications

Last year Ben Hunter published a PowerShell script that is designed to remove the built-in Windows 8 applications when creating a Windows 8 image. Well now that Windows 8.1 has been released it must update the PowerShell script to work with Windows 8.1.

The script below takes a simple list of Apps and then removes the provisioned package and the package that is installed for the Administrator. To adjust the script for your requirements simply update the $AppList comma separated list to include the Apps you want to remove. The script is designed to work as part of an MDT or Configuration Manager task sequence. If it detects that you are running the script within a task sequence it will log the to the task sequence folder otherwise it will log to the Windows\temp folder.

I chanced the script a little bit. I don’t want to remove some programs dat Ben Hunter did…

The Script:

<#    
    ************************************************************************************************************
    Purpose:    Remove built in apps specified in list
    Pre-Reqs:    Windows 8.1
    ************************************************************************************************************
#>

#—————————————————————————————————————
# Main Routine
#—————————————————————————————————————

# Get log path. Will log to Task Sequence log folder if the script is running in a Task Sequence
# Otherwise log to \windows\temp

try

{
$tsenv = New-Object -COMObject Microsoft.SMS.TSEnvironment
$logPath = $tsenv.Value(“LogPath”)
}
catch
{
Write-Host “This script is not running in a task sequence”
$logPath = $env:windir + “\temp”
}
$logFile = “$logPath\$($myInvocation.MyCommand).log”

# Start logging
Start-Transcript $logFile
Write-Host “Logging to $logFile”

# List of Applications that will be removed

$AppsList = “microsoft.windowscommunicationsapps”,”Microsoft.BingFinance”,”Microsoft.BingMaps”,`
“Microsoft.BingWeather”,”Microsoft.ZuneVideo”,”Microsoft.ZuneMusic”,”Microsoft.Media.PlayReadyClient.2″,`
“Microsoft.Media.PlayReadyClient.2″,”Microsoft.XboxLIVEGames”,”Microsoft.HelpAndTips”,”Microsoft.BingSports”,`
“Microsoft.BingNews”,”Microsoft.BingFoodAndDrink”,”Microsoft.BingTravel”,”Microsoft.WindowsReadingList”,`
“Microsoft.BingHealthAndFitness”,”Microsoft.WindowsAlarms”,”Microsoft.Reader”,”Microsoft.WindowsSoundRecorder”,”Microsoft.SkypeApp”

ForEach ($App in $AppsList)

{
$Packages = Get-AppxPackage | Where-Object {$_.Name -eq $App}
if ($Packages -ne $null)
{
  Write-Host “Removing Appx Package: $App”
  foreach ($Package in $Packages)
      {
      Remove-AppxPackage -package $Package.PackageFullName
      }
}
else
{
      Write-Host “Unable to find package: $App”
}
$ProvisionedPackage = Get-AppxProvisionedPackage -online | Where-Object {$_.displayName -eq $App}
if ($ProvisionedPackage -ne $null)
{
      Write-Host “Removing Appx Provisioned Package: $App”
      remove-AppxProvisionedPackage -online -packagename $ProvisionedPackage.PackageName
}
else
{
      Write-Host “Unable to find provisioned package: $App”
}

}

# Stop logging
Stop-Transcript

Translate »