VMware Workstation 10

VMware Workstation takes virtualization to the next level:

  • Support for the latest Guest OS’es like Microsoft Windows 8.1 and various Linux distributions.
  • The new hardware version 10 introduces even bigger and better Virtual Machines
    Up to 16 vCPUs
    64GB of vRAM
    8TB disks.
    vSATA support has been added
    Up to 20 networks can be defined.
    Various USB improvements (usb3 stream support, among other things)
    SSD pass through makes for better support of the underlying hardware platform.
  • New Virtual Appliances created with the Workstation team to quickly run various cloud stacks like Pivotal, Puppet Labs and Vagrant.

The team has included various smaller improvements in the product as well:

  • Better multi-monitor support for up to 4 screens
  • Unity mode has been enhanced to seamlessly work with Windows 8.1 UI changes
  • An updated version of VMware Converter has been built in and adds support for P2V’ing a Windows 8.1 machine
  • New option to display the VM console using VMware-KVM, a ‘screen-only’ window without any bells or whistles.

VMware OS Optimization Tool

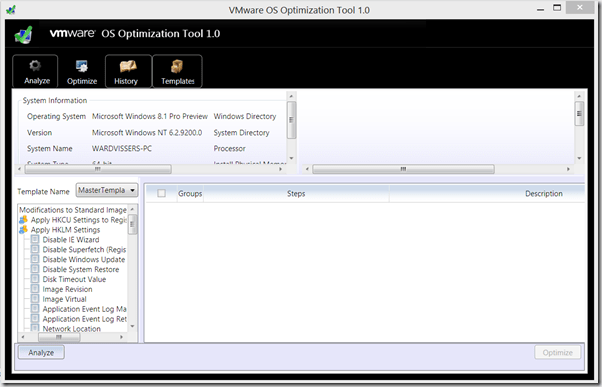
The VMware OS Optimization Tool helps optimize Windows 7 desktops for use with VMware Horizon View. The optimization tool includes customizable templates to enable or disable Windows system services and features, per VMware recommendations and best practices, across multiple systems. Since most Windows system services are enabled by default, the optimization tool can be used to easily disable unnecessary services and features to improve performance.

You can perform the following actions using the VMware OS Optimization Tool:

  • Analyze
  • Optimize
  • Viewing History
  • Managing Template

Also included is the Remote OS Optimization Tool, which uses the same functionality as the Optimization Tool, but connects to a remote VMware View broker so that remote parent and template VMs can be enumerated and optimized.

image7

Z-Hire Active Directory User Creation Tool

I want you to inform about a great tool.

Z-Hire automates the IT user account creation process for Exchange mailbox, and Active Directory and Lync accounts. With just a click of the button, your Exchange mailbox, and Active directory user, Lync account and SalesForce User account will be created simultaneousy. Z-Hire serves as the platform for new hire accounts by allowing auto-creation of major IT accounts with the option for custom scripts. Z-hire will decrease your account deployment time by 600%, without the need for complicated and expensive identity management solutions. This tool makes creating Active Directory users a breeze. Some of the features include:

– Environment Auto discovery (AD/Exchange/Lync/SalesForce)
– Support for Active Directory user, Exchange, Lync 2010 and SalesForce user accounts
– Template based deployment (allows consistency for all user accounts)
– Active Directory user creation with major attributes
– Active Directory group selection
– Active Directory user duplicate SamAccountName detection – Lync 2010 / 2013 user account creation supporting all policies
– SalesForce user account creation supporting all attributes
– Faster performance (compared to previous version)

Supported Environments / IT systems
– Active Directory (all versions)
– Exchange 2007 (all versions)
– Exchange 2010 / 2013 (all versions)
– Lync 2010 / 2013 (both Standard and Enterprise versions)
– Office 365 Cloud
– SalesForce Cloud

Screenshot #1 – Active Directory
Screenshot #2 – Active Directory
Screenshot #3 – Active Directory
Screenshot #4 – Exchange
Screenshot #5 – Lync
Screenshot #6 – Supported Systems

SYSTEM REQUIREMENTS
– .NET 3.5 and .NET 4.0
– Domain Joined

COMPATIBLE OS
– Windows 7 X64
– Windows Server 2008 X64
– Windows Server 2008 R2 X64
– Windows Server 2012

Please download administration guide:1
http://www.zohno.com/docs/Z-Hire_V4_Administration_Guide.pdf

Download: Z-Hire

Z-Term Active Directory User Termination Tool

I want you to inform a about a great tool Z-Term Active Directory User Termination Tool

This application allows IT administrators to automate common tasks when an employee leaves the company. Usually, IT administrators use multiple consoles and perform variety of tasks to terminate user accounts. This tool allows IT administrator to automate:

Active Directory Tasks
– Disable Active Directory Account
– Reset Active Directory Password
– Move users to dedicated OU
– Remove Active Directory Group membership
– Clear Manager field in AD
– Set Description field
– Set Notes field
– Remove Active Directory Account

Exchange Tasks
– Change Distribution List ownership to
– Set customAttribute5
– Set out of office reply
– Forward Email
– Grant full access permission
– Hide user from Global Adress List
– Remove Calendar items from resources.(remove calendar items where user is an organizer of)
– Cancel meetings from termined user’s mailobx(cancel meetings where user is an organizer of)
– Disable mailbox
– Export mailbox to PST format
– Remove ActiveSync device partnership
– Remote wipe user’s ActiveSync device

Lync
– Disable Lync Account

Office 365
– MSOL User – Reset Password
– MSOL User – Remove Office 365 License
– MSOL User – Remove User
– MSOL Exchange – Clear Out of Office Reply
– MSOL Exchange – Hide User from GAL
– MSOL Exchange – Change Distribution List Ownership
– MSOL Exchange – Set CustomAttribute
– MSOL Exchange – Set Out of Office Reply
– MSOL Exchange – Set Grant FullAccess Permission
– MSOL Exchange – Set email forwarding
– MSOL Exchange – Remove calendar items from resource mailboxes

File Operations
– Move home folder
– Export user settings to XML (dump all user data to xml as backup)
– Run custom script ( for advanced users only, contact support for more info )

Screenshot #1 – Active Directory
Screenshot #2 – Exchange
Screenshot #3- File Operations

SYSTEM REQUIREMENTS
– .NET 3.5 and .NET 4.0
– Domain Joined

COMPATIBLE OS
– Windows 7 X64
– Windows Server 2008 X64
– Windows Server 2008 R2 X64
– Windows Server 2012

Please download administration guide: http://www.zohno.com/docs/Z-Term_V4_Administration_Guide.pdf

Download: Z-Term
System Center Summer Night

For wo that missed the Dutch System Center Summer Night community event. Here are the slides: 

Microsoft Deployment Toolkit 2013 Preview

The Client Management team is happy to announce the availability of the Microsoft Deployment Toolkit (MDT) 2013 Preview. Download the installer file and release notes from the Client Management program on Connect in the MDT group.

New members must first join the MDT group of the Client Management program on Connect.

MDT 2013 Preview includes:

  • Support for the Windows Assessment and Deployment Kit (ADK) for Windows 8.1 Preview. (The Windows ADK for Windows 8.1 Preview is available on the Microsoft Download Center.)
  • Support for deployment of Windows 8.1 Preview and Windows Server 2012 R2 Preview, as well as Windows 7 and Windows 8 families of operating systems.
  • Support for zero-touch integration (ZTI) with System Center 2012 R2 Configuration Manager Preview.

We encourage you to download and use MDT 2013 Preview, and then submit suggestions, bugs and feedback via the Connect site

Windows 8.1 & Server 2012 R2 Preview Availably

If you have a Technet or a MSDN account you can download Windows 8.1 & Server 2012 R2 Preview

Windows 8.1 Preview
image

Server 2012 R2 Preview
image

ADK for Windows 8.1 Preview Available

Here is a quick summary of the changes in ADK for Windows 8.1. MDT 2013  and ConfigMgr 2012 R2 requires ADK for Windows 8.1.

Windows 8.1 Image Size (Preview)
  • Windows 8.1 Preview Code Image (x86), 2.13 GB (WIM), 7.65 GB expanded on disk.
WinPE 5.0
  • Profiling in WinPE 5.0 is removed
  • WinPE 5.0 x64 supports 4 TB of RAM (still 64 GB for x86)
  • Scratchspace set automatically to 512 MB when having more than 1 GB of RAM, otherwise 32 MB
USMT 6.3
  • Support for Windows 8.1
  • You cannot use USMT 6.3 to migrate settings from Windows XP to Windows 8.1
  • Supports Office 2013 (hotfix available for USMT 5.0).
Windows 8.1 Upgrade / Update
  • You are likely to have more free space available on the disk after upgrading Windows 8 to Windows 8.1
  • Windows 8.1 upgrade time, less than 20 minutes
Misc. Updates
  • Export compressed recovery image (/Export-Image)
  • Cleanup base components when superseded. (/StartComponentCleanup /ResetBase)

 Download

Office Web Apps 2013 KB2592525 not installing

I’ve recently installed Office Web Apps 2013. The installation is straight forward and documented on Technet . However, there was on tricky issue. KB2592525 is a prerequisite and the PS New-OfficeWebAppsFarm cmdlet checks if the KB2592525 is installed. I was installing on a Windows Server 2008 R2 SP1 with all the actual patches. But KB2592525 was not installed and the KB2592525 installer refused to install on this machine. One way to get around this issue is to force the update using pkgmgr.

  1. Download KB2592525 to folder on your system
  2. Create a new folder called “files”
  3. Extract the MSU: expand Windows6.1-KB2592525-x64.msu –F:* .\install
  4. go to files
  5. Install using Pkgmgr: pkgmgr.exe /n:c:\install\Windows6.1-KB2592525-x64.xml

That’s it, and the New-OfficeWebAppsFarm cmdlet will accept this workaround.

How to Improve Move Request Performance in Exchange 2010

This article provides step-by-step procedure about How to Improve Move Request Performance in Exchange 2010.

The Microsoft Exchange Mailbox Replication Service is responsible for Mailbox Move requests.
MSExchangeMailboxReplication.exe.config is Mailbox move request configuration file located in the following location: <Exchange Installation Path>\Program Files\Microsoft\Exchange Server\V14\Bin

How to Improve Move Request Performance in Exchange 2010:
1. Go to Exchange Mailbox Server
2. Navigate to the <Exchange Installation Path>\Program Files\Microsoft\Exchange Server\V14\Bin folder
3. Make a backup copy of MSExchangeMailboxReplication.exe.config before making any changes in it.
4. Open the Original MSExchangeMailboxReplication.exe.config file in notepad.
image
5.Modify the following values to increase the performance
MaxActiveMovesPerSourceMDB = “50″
MaxActiveMovesPerTargetMDB = “50″
MaxActiveMovesPerSourceServer = “200″
MaxActiveMovesPerTargetServer = “200″
MaxTotalMovesPerMRS = “300″

6. Save the file and Close it
7. Go to Services console
8. Restart the Microsoft Mailbox Replication Service

Windows 2008 (R2) Network tuning to Increase Move mailbox Speed:
1. Go to Start –> Command prompt –> Right Click –> Click Run as administrator
2. Execute the following command: netsh int tcp show global
image
3. Disable TCP Chimney Offload and Receive Side Scaling on the network adapters
netsh int tcp set global chimney=disabled
netsh int tcp set global rss=disabled
4. Run the following command and make sure Chimney Offload State & Receive-Side Scaling State is disabled.
image
5. Restart the Server.

Translate »