MDT 2010 Update 1 Beta Released

The Solution Accelerators Team have released Microsoft Deployment Toolkit 2010 Update 1 Beta and would like your feedback.

Download the beta now at https://connect.microsoft.com/site14/Downloads/DownloadDetails.aspx?DownloadID=8689

MDT 2010 Update 1 provides new capabilities, such as:

· Support for Microsoft Office 2010.

· A new User-driven Installation (UDI) deployment method (formerly known as “Modena”) for Microsoft System Center Configuration Manager 2007. UDI gives information technology (IT) staff control over the deployment experience while empowering users to interact with and customize their operating system deployment through an easy-to-use wizard.

· Improvements to the Deployment Workbench driver import process, detecting each driver’s true supported platforms.

· Many bug fixes and other small improvements.

This release supports the deployment of the Windows® 7; Windows Vista®; Windows XP; Windows Server® 2008 R2; Windows Server 2008; and Windows Server 2003 operating systems. See the Microsoft Deployment Toolkit Documentation Library, which is included with MDT 2010 Update 1, for the complete documentation for this release.

MDT HP,Lenovo,Dell tools for getting the right drivers for a specific model

When you search a driver for a specific model you always go to the HP, Dell, Lenovo, Dell site and  then you go to download section and chose the model of your pc/laptop and os version and download the drivers.

The Are some handy tools for you:

Dell Tool:
Dell makes drivers driver CABs which incluse all your drivers for your model and OS.
image

HP Tool:
HP SoftPaq Download Manager provides a simple, powerful way to download software updates for the HP client PC models in your environment. HP SDM can significantly reduce the amount of time it takes to locate and download updates. SoftPaqs can be downloaded in as few as three easy steps from a single user interface after initial setup.

SDM_IM 

Lenovo Tool:
ThinkVantage Update Retriever enables you to download update packages from the Lenovo Help Center Web site to a network share repository folder.
This is a search tool. You give the model nummer en os and Update Retriever and scan the Lenovo Help Center Web site for the latest driver
image

WAIK Add Drivers to a Wim File

Some handy Windows 7 Waik commands to add drivers to a wim file.
Before you start copy the wim file to your harddisk

1. Some information about the Wim:
Dism /Get-WimInfo /WimFile:d:\boot.wim

2. Mount the wim file to a folder:
Dism /Mount-Wim /index:1 /WimFile:d:\boot.wim /MountDir:d:\mountpe

3. Add the Driver:
Dism /Image:d:\mountpe /Add-Driver /Driver:d:\nic\b57nd60x.inf

4. Close the wim file and saving the file:

Dism /Unmount-Wim /MountDir:d:\mountpe /Commit

Restore an Windows 7 Capture with MDT 2010

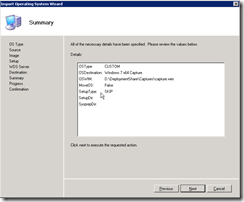
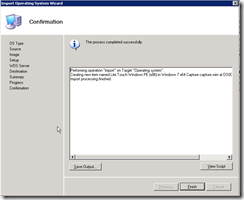
Step1: Import the Capture Image.

You can find the capture file at  \\server\deploymentshare$\Capture or x:\deploymentshare\capture.

image image
If you have already imported Windows 7 DVD.
You can chose for Sysprep and Setup files are not needed. The Setup will copy them automatically when de Capture wil be deployed. 
image image
image  image

Step 2. Create a Normal Client Task with the OS Capture that you imported.

Capture an Existing Windows 7 install with MDT

You can With MDT capture an existing Windows 7 Install.
1. Creating the Task in MDT
2010-04-18_134159 2010-04-18_134127
Jou must Chose the OS version witch you want to capture.

2010-04-18_134151 2010-04-18_134213
2010-04-18_134231 2010-04-18_134317
2010-04-18_134327 2010-04-18_134336

2. Create a copy from the Customsettings.ini
    Edit the Customsettings.ini with de following text.

[Settings]
Priority=Default
Properties=MyCustomProperty

[Default]
OSInstall=Y
SkipAppsOnUpgrade=YES
SkipCapture=NO
SkipAdminPassword=YES
SkipProductKey=YES

4. Connect to the deployement share \\server\deploymentshare$ and go to the folder script and double click on LiteTouch.vbs
2010-04-15_162332 2010-04-15_162453

2010-04-15_1626352010-04-15_162645

2010-04-15_162659
4. Don’t forget after the Capture to restore the original customsettings.ini file.

Solution for "Multiple connections to a server or shared resource by the same user, using more than one user name, are not allowed"

When you use MDT you see many times the following error:
"Multiple connections to a server or shared resource by the same user, using more than one user name, are not allowed"

Solution 1:
To fix the problem you should edit the ztiutility.vbs file in the deployment share under the scripts folder.  Open the file in notepad and replace the following code in the MapNetworkDriveEX function:

Case Else
‘ Case &h800704C3 ‘ Multiple connections to a server or shared resource by the same user, using more than one user name, are not allowed.
‘ Case &h8007052E ‘ Logon failure: unknown user name or bad password.
‘ There was a some kind of fatal error.
If ErrDesc <> "" then
             MapNetworkDriveEx = ErrDesc
Else
             MapNetworkDriveEx = "Unable to map UNC Path " & sShare & " :" & "( 0x" & hex(HasError) & " ) "
End if
oLogging.CreateEntry MapNetworkDriveEx & "", iLogType
Exit function
End select

With this code:

Case Else
Err.Clear
On Error Resume Next
oNetwork.MapNetworkDrive  chr(sDrive)&":", sShare, False
HasError = err.number
ErrDesc = err.Description
On Error Goto 0
If Err.Number <> 0 Then
‘ There was a some kind of fatal error.
             If ErrDesc <> "" then
                                        MapNetworkDriveEx = ErrDesc
             Else
                                        MapNetworkDriveEx = "Unable to map UNC Path " & sShare & " :" &    "( 0x" & hex(HasError) & " ) "
             End if
             oLogging.CreateEntry MapNetworkDriveEx & "", iLogType
             Exit function
Else
      Exit Function
End If 

End select

Solution 2

Download ZTIUtility.7z and replace the ztiutility.vbs with the one in the ZTIUtility.7z. You need 7zip to unpack the file.

http://support.microsoft.com/kb/977566

MDT 2010 Health Care

MDT 2010 Health Care is een samenvatting van best practices voor het aanpassen,  bouw en migreren, en beveiligen van Windows XP, Windows Vista of Windows 7 machines. Ook wordt hier kort beschreven hoe men applicaties kan uitrollen (scripted installs,silent installetie, application packages) als onderdeel van de uitrol. Het gaat om het uitrollen van een standaard desktop voor gemeenschappelijk gebruik. Tevens wordt besproken hoe men de gegeven van een gebruiker mee kan nemen naar de nieuwe werkplek.

Handleidingen:
Healthcare Desktop User State Migration Guide
Automated Build Application Integration Guide
Healthcare MDT 2010 Administrators Guide
Automated Build Healthcare Desktop and Server Guide

Downloaden van de MDT HealthCare doe je hier: MDT HealthCare

Installatie:

 image image
image image
image image

Voorbeeld wat Health Care automatisch aanmaakt:

image

De gemaakte Deployment Point Image “LiteTouchPE_x86.wim” Toevoegen aan Windows Deployment Services (WDS)

Onder E:DistributionBoot vind je 2 bestanden LiteTouchPE_x86.wim en LiteTouchPE_x86.iso

De WIM kun je aan WDS aan hangen onder Boot Images en de ISO kun je branden als je toevallig een netwerkkaart kaart hebt die geen PXE ondersteund.

clip_image001
clip_image002
clip_image003
clip_image004
clip_image005
clip_image006
image

64 bit Windows PE niet te zien in Windows Deployment Services

Zie je het volgende artikel voor het gemiste x64 in PXE.

http://technet2.microsoft.com/WindowsVista/en/library/9e197135-6711-4c20-bfad-fc80fc2151301033.mspx?mfr=true

Je moet x64 aanzetten als je 64bits OS wilt uitrollen via WDS zie het volgende stukje tekst:

• x64-based client computers do not receive an x64 Windows PE boot image. This can occur if the PXE basic input/output system (BIOS) implementation of the network booting computer does not correctly identify itself as being capable of working with x64-based computers. To work around this issue, enable architecture detection in the boot programs. To do this, run this command on your WDS server:

Commando: WDSUTIL /set-server /architecturediscovery:yes

Windows Deployment Feature op Windows 2008

1. Installeer WAIK op de Server die WDS moet gaan verzorgen.

2. Als eerste heb ik Windows Deployment feature geïnstalleerd.

3. Daarna heb ik WDS Server geconfigureerd. Zorg dat je de remoteinstall map op een harde schijf zet met genoeg ruimte.  

4. Daarna heb ik onder Install Image groep aangemaakt genaamd Ward waar alle gemaakte Images bewaard kunnen worden.

clip_image001

5. Ik heb ook een paar opties geconfigureerd. Zie de volgende scherm afbeeldingen

clip_image002clip_image005

clip_image003clip_image004

Vergeet niet op de DHCP Server optie 60 te configureren.

Translate »