Publish Exchange 2013 With Forefront Threat Management Gateway


TMG doest not support jet Exchange 2013. But with minor changes you get it working Smile

Change in the OWA Rule

In Exchange 2013 changed the published server logoff URL to /owa/logoff.owa

image

You need create a Extra Rule Exchange 2013 APPS Rule

image
You need the ExchangeGuid

Powershell:

Get-Mailbox -Arbitration | where {$_.PersistedCapabilities -like “OrganizationCapabilityClientExtensions”} | fl exchangeGUID, primarysmtpaddress
ExchangeGuid : 3eccca51-d996-49df-b6e0-302d644fdcaa

image

image

image


Totally:
image

Upgraded my Home Lab and changed from ESXi5.1 to Hyper-V 2012

Last weekend I upgraded my Home Lab and changed from ESXi5.1 to Hyper-V 2012.

Hardware

AMD A8 3870K 3.00GHz 4MB FM1 Box  
Asus F1A75-V PRO AMD A75, SATA600 RAID, HDMI (ESXi5.1 Works to with extra E1000 nic) 
32GB 8×4 Kingston HyperX

Converted al my VM’s with StarWind V2V Converter

image

It Rocks!!! Smile

Exchange 2013 CU1 delayed, Planned for April the 2nd

The last piece required to support coexistence and start migrating from Exchange 2010 to Exchange 2013, just got delayed some days…

“We found an issue with Exchange 2010 coexistence. The issue actually had an easy workaround, but we made a decision; instead of burdening you with a configuration change on all of your Exchange 2010 Client Access servers, we decided to take a code change in Exchange 2013 and solve the problem so that you will not have to make any additional configuration changes. Given that the goal of CU1 is to enable coexistence with legacy versions of Exchange, we felt this was the right decision; after all, we want to ensure that your upgrade to Exchange 2013 and your coexistence period goes as smooth as possible.”

“The release date for Exchange 2013 RTM CU1 is currently planned for April 2nd”

Publish all Exchange roles on one TMG listener

I have only 1 public IP address in my testlab so I wanted also deploy Outlook Anywhere so dat I can reseice mail from every where I am.

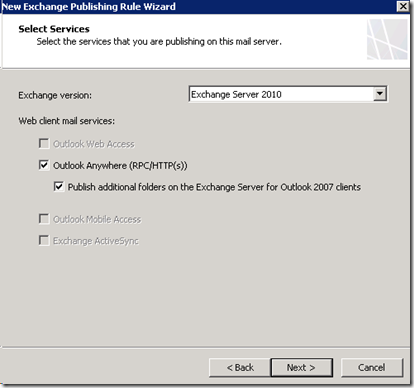
Configure Outlook anywhere rule on TMG

  1. Open Forefront TMG
  2. Click on image_thumb5[1]
  3. In the Action Pane under Task click image_thumb6[1]
  4. Give the rule a Name ill name mine “2010 OA”
  5. image
  6. Next –> Next
  7. image_thumb8[1]
  8. Internal Site Name should be your CAS server FQDN (needs to be on the cert)
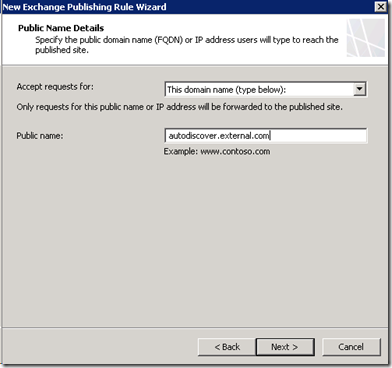
  9. image_thumb9[1]
  10. The external name is what you use to access OA (Also needs to be on the cert)
  11. image
  12. Click –> Next –> Finish –> Select the Listener. (Choose the OWA listener you created before)

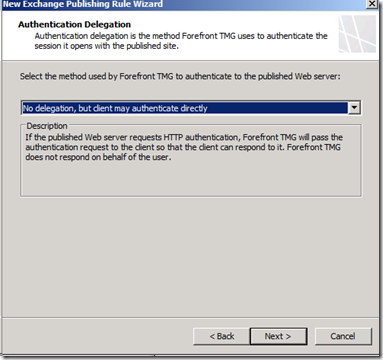
  13. This step moves the auth from the TMG server and moves it to the Exchange
  14. image
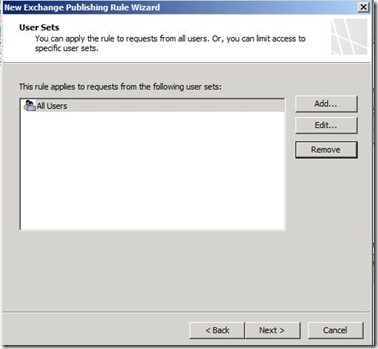
  15. Modify the User set to include “all users” and remove “all authenticated users”.
  16. clip_image002
  17. You may get the following error you can click ok and ignore it. (Do not check require users to authenticate check box on the listener or this method will not work)
  18. clip_image002[5]
  19. Finish
  20. Now Outlook anywhere is published using the same listener as OWA! (Albeit without pre-auth)

After configuring DirectAccess in an IPv4-only deployment with a single network adapter, and after the default DNS64 (the IPv6 address which contains ":3333::") is automatically configured on the network adapter, attempting to enable load-balancing via the Remote Access Management console causes a prompt for the user to supply an IPv6 DIP. If an IPv6 DIP is supplied, the configuration fails after clicking Commit with the error: The parameter is incorrect.

  1. Download the backup and restore scripts from Back up and Restore Remote Access Configuration.
  2. Back up your Remote Access GPOs using the downloaded script Backup-RemoteAccess.ps1
  3. Attempt to enable load balancing until the step at which it fails. On the Enable Load Balancing dialog box, expand the details area, right-click in the details area, and then click Copy Script.
  4. Open Notepad, and paste the contents of the clipboard. For example:

    Set-RemoteAccessLoadBalancer -InternetDedicatedIPAddress @(‘10.244.4.19/255.255.255.0′,’fdc4:29bd:abde:3333::2/128’) -InternetVirtualIPAddress @(‘fdc4:29bd:abde:3333::1/128’, ‘10.244.4.21/255.255.255.0’) -ComputerName ‘DA1.domain1.corp.contoso.com’ -Verbose

  5. Close any open Remote Access dialog boxes and close the Remote Access Management console.
  6. Edit the pasted text and remove the IPv6 addresses. For example:

    (Remove de IPv6 IP Addresses)
    Set-RemoteAccessLoadBalancer -InternetDedicatedIPAddress @(‘10.244.4.19/255.255.255.0’) -InternetVirtualIPAddress @(‘10.244.4.21/255.255.255.0’) -ComputerName ‘DA1.domain1.corp.contoso.com’ -Verbose

    In an elevated PowerShell window, run the command from the previous step.

  7. If the cmdlet fails while it is running (not due to incorrect input values), run the command Restore-RemoteAccess.ps1 and follow instructions to make sure that the integrity of your original configuration is maintained.
  8. You can now open the Remote Access Management console again.

Migrate a certificate authority from Windows 2008 R2 to Windows 2012

Today I was moving my testlab enterprise root CA from a Windows 2008 r2 server to a new Windows 2012 with a different server name. To accomplish this, I used this excellent Technet Post . I encountered no problems!

Create Internal Wildcard Certificate

I created I internal wildcart Certificate. This i ideal when you want do some testing and you not any certificate from a Third-Party.

You must have a internal CA Winking smile

Open IIS

Go to Server Certificates

Choise Create Domain Certificate

image

image

image

Now you can export this Certificate Smile.

Very handy when you want to test Exchange 2013 & TMG or any other product.

Exchange 2013 ECP Redirects to old Exchange 2010 OWA

I recently setup an Exchange 2013 Server in an Exchange 2010 Environment.

All worked fine, but logging in to https://ex2013.wardvissers.nl/ecp redirected me to the old Exchange 2010 Interface.

image

image


Solution 1:

If you have this problem, you can add the Exchange Version to the URL using “?ExchClientVer=15″.

So https://ex2013.wardvissers.nl/ecp?ExchClientVer=15 will redirect you to the correct Management Interface.

image

Note: If the Mailbox of the Administrator account resides on the new Exchange 2013 Server this will be obsolete.

Solution 2:

Or you add an extra / add the end https://ex2013.wardvissers.nl/ecp/

Exchange Server 2013 Deployment Assistant

ExchangeTeam the announce the availability of the Exchange Server 2013 Deployment Assistant at http://technet.microsoft.com/exdeploy2013. The Exchange Deployment Assistant is a web-based tool that helps you deploy Exchange 2013 in your on-premises organization, configure a hybrid deployment between your on-premises organization and Office 365, or migrate to Office 365. It asks you a small set of simple questions and then, based on your answers, creates a customized checklist with instructions to deploy or configure Exchange 2013. Instead of trying to find what you need in the Exchange library, the Deployment Assistant gives you exactly the right information you need to complete your task.

The first scenarios available show you how to deploy Exchange 2013 in an organization with no previous installations of Exchange and show you how to configure a hybrid deployment between your on-premises Exchange 2013 organization and Office 365. We’re working hard on additional scenarios, such as upgrading from Exchange Server 2007 and Exchange Server 2010. These additional scenarios will be added in the coming months.

The Deployment Assistant for Exchange 2013 is supported on most major browsers and has a completely redesigned interface that’s no longer dependent on Silverlight technology. Here’s a screenshot from the Deployment Assistant after the initial set of questions were answered and the customized checklist was generated.

image

Translate »